WorkSpace 统一工作台 二开工程
背景
随着业务方需求的不断变化,不同用户所需要的工作台不一样,然而预留对应的口子无法满足不同用户的需求,为了提供给客户更好的体验,我们在 017 版本的更新迭代中加入了新的二开机制。
二开范围
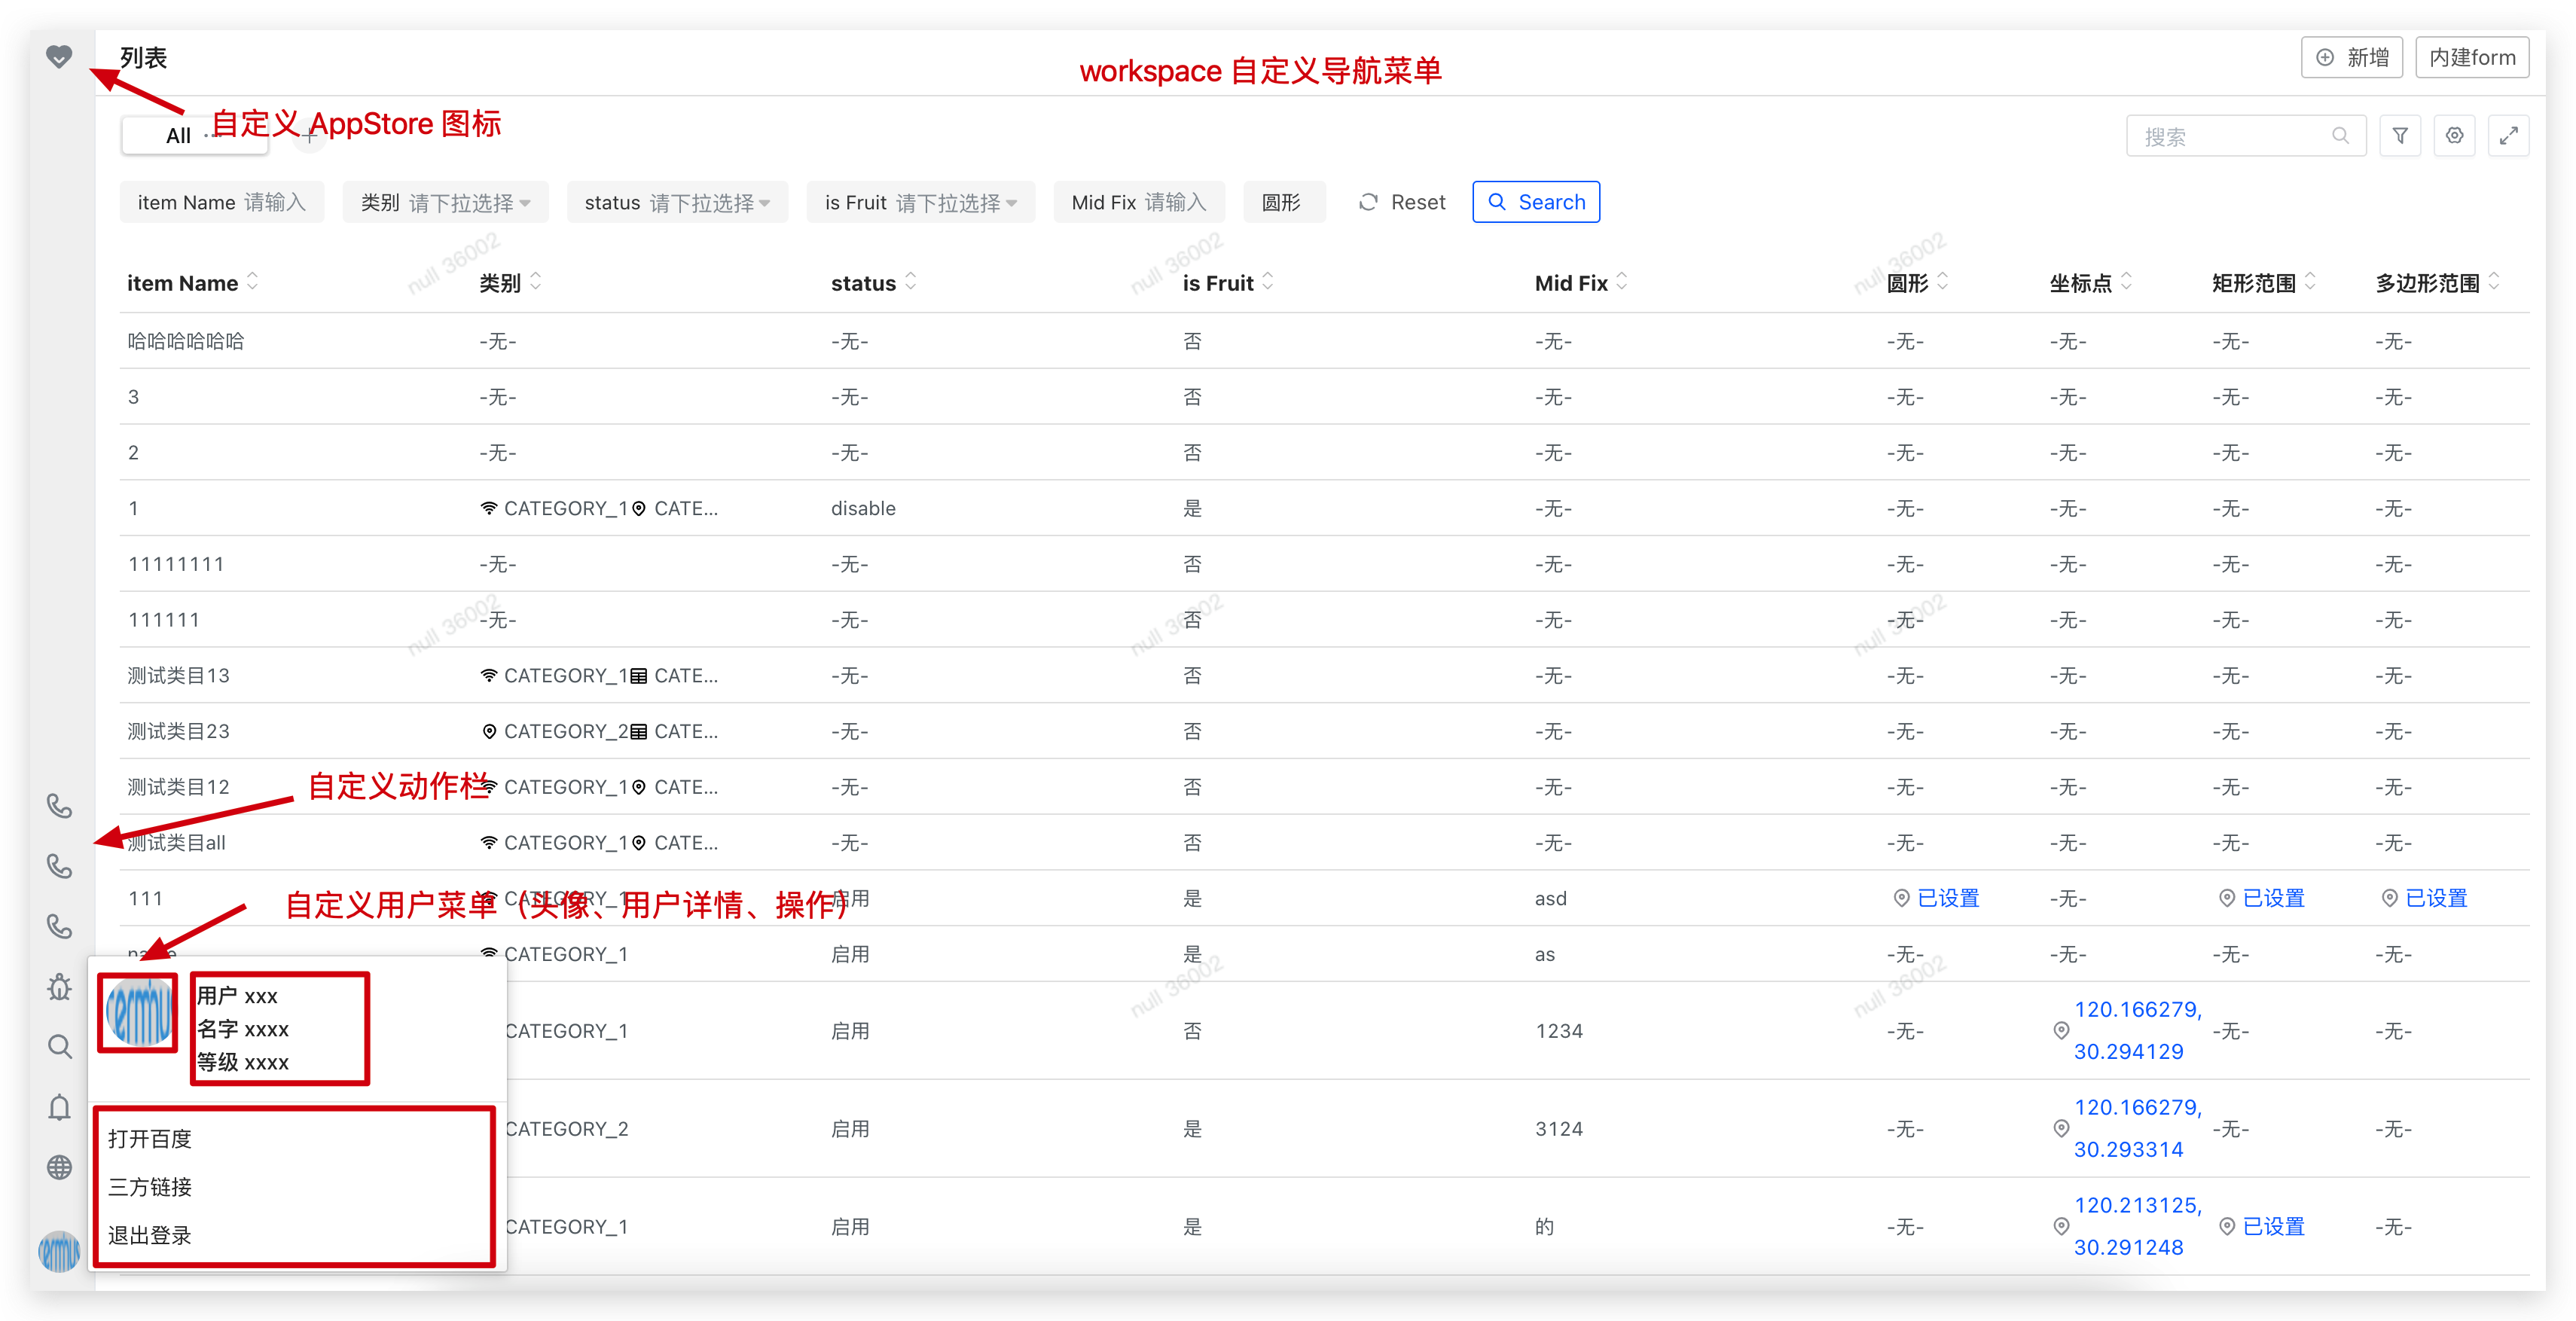
目前支持的二开功能有:
- 自定义 AppStore 的图标
- 自定义动作栏
- 自定义用户菜单(头像、用户详情、操作)
二开流程
Tip: 二开需要前端的介入
-
安装@terminus/t-nest。
- 首先我们需要安装 @terminus/t-nest 工具,
npm install @terminus/t-nest - 然后在终端中运行
t-nest override workspace命令,根据提示进行输入对应线上环境地址用于同步依赖,安装好了以后对应目录下会多出workspace文件夹,即为二开工程即为二开工程
- 首先我们需要安装 @terminus/t-nest 工具,
-
安装依赖。在克隆下来以后,我们需要安装对应的依赖,然后进入二开工程的根目录,执行
yarn来安装对应的依赖。 -
**启动开发环境。**在二开工程根目录执行
yarn run start以开发模式启动对应的应用,然后使用访问 workspace.terminus.io:8399 便可进入对应的二开环境。建议使用 SwitchHosts 将域名 workspace.terminus.io 解析到本机回送地址 127.0.0.1
-
打包。在开发完毕以后,在工程根目录执行
yarn run build,打包工程。执行成功以后根目录下会生成一个dist文件夹,该文件夹,然后将其上传到 OSS 中。 -
上传 OSS
在根目录下 oss.config.json 中配置 OSS ,目前仅支持(阿里云 OSS),然后在根目录下运行
yarn run upload,即可将二开文件上传到 阿里云 OSS,上传成功后会有以下对应的提示。Terminal window 成功上传 dist 到 OSS!对应目录: 'http://overwride-oss.oss-cn-hangzhou.aliyuncs.com/1630302906/请在 erda 环境变量中配置 WEBNEST_OVERRIDE=http://overwride-oss.oss-cn-hangzhou.aliyuncs.com/1630302906/trantor.module.json -
配置环境变量。在 Dice 部署的 workspace 中配置环境变量,这里我们可以参考 WorkSpace 环境变量配置。
-
WEBNEST_OVERRIDE
指向 OSS 中对应
trantor.module.json的地址例如:
WEBNEST_OVERRIDE=http://overwride-oss.oss-cn-hangzhou.aliyuncs.com/1630302906/trantor.module.json
在配置完成后,重跑流水线,查看二开效果。
-
如何二开
工程根目录的 overwrite.tsx文 中的有一个名为 GlobalNavigationOverwrite 类,它会继承自父类 GlobalNavigation,并针对原有的类属性继承修改,当前我们主要暴露出来三个类的属性。
-
public globalNavigationProp一般用于定制二开左上角 app-store 图标一般来说我们仅需修改 globalNavigationProps 对象中的 slot 属性,改为自己想要的 ICON 即可
// 定制左上角 app-store。public globalNavigationProps: NGlobalNavigationProps = {appName: 'Trantor',layout: "vertical" as 'vertical',// 修改导航栏主题,可以在环境变量中配置,这里一般不需要动theme: this.props.configure.featureResolve('GLOBAL_THEME_NORMAL', false) ? Theme.NORMAL : Theme.LIGHT,lightHorizontalBrandIcon: null,slot: {// appStore图标,这里我们可以用 nusi 的图标或者自定义的图标// nusi 图标地址:https://nusi-webback.terminus.io/components/iconelement: <Icon type="service" theme="filled" onClick={() => this.handleAppstore({ hidden: false })} />}} -
get operations()自定义动作栏operations 数组中接受我们想要自定义的 action
type action = {title: string; // 注意国际化icon: React.Element; // 图标 https://nusi-webback.terminus.io/components/icononClick: () => void; // 点击 icon 方法};// 自定义导航菜单class GlobalNavigationOverwrite extends GlobalNavigation {@computedget operations(): RightOperationItemProps[] {const operations = [];const { layoutStore, Languages, Notice, Debuger, configure } = this.props;// 自定义operations.push({title: intl.get('自定义').d('自定义'),icon: <Icon type='phone' />,onClick: () => alert('自定义')})return operations} -
get userMenu()自定义用户菜单(头像、用户详情、操作)// 用户中心配置@computedget userMenu(): UserMenuProps {const { globalStore } = this.props;const { current = {} } = globalStore;return {// name: <span onClick={this.handleUser}>{current.username || current.mobile}</span> as any,// 名字,也可在这里传入自定义 react 组件,比如下面的 自定义用户中心 CustomUserCentername: <CustomUserCenter/> as any,// 用户头像avatar: {src: 'https://www.terminus.io/static/images/logo.png',},//operations: [{title: intl.get('打开百度').d('打开百度'),onClick: () => window.open('https://www.baidu.com')},{title: intl.get('三方链接').d('三方链接'),onClick: () => window.open('https://terminus.io/')},{title: intl.get('退出登录').d('退出登录'),onClick: this.handleLogout}]}}
二开示例(替换 Service 接口 - 用户登录,退出接口)
1,再二开工程新增文件 service-override.ts
2, 追加代码并导出
import { TModule, InjectModules } from "@terminus/trantor-framework";import { GlobalService } from "@terminus/t-workspace";
@TModule("globalService").Options({  type: "Class",  injectable: true,  isPrimary: true,})export default class GlobalServiceOverride extends GlobalService {  // 登陆地址(这个方法重写就行了)  public getLoginAddr = () =>    `//${      this.environment["META_STORE_URL"]    }/api/trantor/user/login?redirectUrl=${encodeURIComponent(location.href)}`;
  // 退出地址(这个方法重写就行了)  public getLogoutAddr = (redirectUrl?: string) =>    `//${      this.environment["META_STORE_URL"]    }/api/trantor/user/logout?redirectUrl=${      redirectUrl || encodeURIComponent(location.href)    }`;}
3, index.ts 统一导入
......
import './service-override';
......
导入 Request 与 自定一个 Service
1, 定义一个 Service custom-service.ts
import { TModule, Inject } from "@terminus/trantor-framework";import { RequestClass } from "@terminus/trantor-framework/lib/system/interface";
@TModule("customService").Options({ type: "Class", injectable: true })class CustomService {  // 注入 request  @Inject("Request") public Request: RequestClass;
  // 注入环境变量  @Inject("Environment") public environment;
  // 自定义 方法示例  public authority = async () => {    const { res } = await this.Request.trantor.get("/api/trantor/user/current");    return res;  };}
export default CustomService;
2,index.ts 入口统一导入
......
import './service-override';
......
3,使用的地方注入 CustomService。例如:GlobalNavigation
@TModule("GlobalNavigation").Options({ type: "Component", isPrimary: true })// @ts-ignore@InjectModules([ "configure", "globalService", "globalStore", "layoutStore", "GlobalAppstore", "Languages", "Notice", "Debuger", "Environment", "customService", // 新增这个地方是注入customService])// @ts-ignore@withRouter// @ts-ignore@observerexport class GlobalNavigationInject extends GlobalNavigationOverwrite { // 这个是组件内使用 public pustData = async () => { const { customService } = this.props; await customService.authority(); };}二开示例(初始化接口后,页面渲染前拦截等操作,制品 release/1.9.2 以后支持)
1, 创建 document-override.tsx
2, 添加重写代码
import { TRoute, InjectModules } from "@terminus/trantor-framework";import { DocumentRoute } from "@terminus/t-workspace";import { observer } from "mobx-react";
@TRoute("/").Options({ key: "root", isPrimary: true })@InjectModules([  "Environment",  "Utils",  "i18n",  "engine",  "configure",  "globalService",  "globalStore",])@observerclass DocumentRouteOverride extends DocumentRoute {  // 等待完成  public async hookAfterBoot(values) {    const { current, list, configuration, languages, text } = values;    /**     * 这里可以调用接口,等等其他操作     * current 是当前请求的用户信息     * list 菜单信息     * configuration 配置中心     * languages 多语言信息     * text 国际化信息     **/
    // 需要返回 true,如果不想继续渲染返回 false    return true;  }}
export default DocumentRouteOverride;
3,再入口文件导入
import './document-override';二开示例(二开布局信息)
1, 创建 layout-override.tsx
2, 贴入代码
import React from "react";import { withRouter } from "react-router";import {  GlobalNavigation,  TrantorLayoutRoute as LayoutRoute,} from "@terminus/t-workspace";import { TrantorLayoutProps as LayoutProps } from "@terminus/t-workspace/lib/routes/trantor.layout";import { observer } from "mobx-react";import { computed } from "mobx";import { Icon } from "@terminus/nusi";import cx from "classnames";import { TModule, InjectModules, TRoute } from "@terminus/trantor-framework";
// 自定义导航菜单@TModule("GlobalNavigation").Options({ type: "Component", isPrimary: true })// @ts-ignore@InjectModules([  "configure",  "tabbars",  "globalService",  "globalStore",  "layoutStore",  "GlobalAppstore",  "Languages",  "Notice",  "Debuger",  "Environment",  "Notification",])// @ts-ignore@withRouter// @ts-ignore@observer// @ts-ignoreclass GlobalNavigationOverwrite extends GlobalNavigation {  // 覆盖原有的 Resize(这里不再需要)  public handleResize = () => {};
  // 重写 globalNavigationProps 把原有的应用去除  @computed  get globalNavigationProps() {    return {      appName: <div ref={this.horizontalAppcenterCenterRef}></div>,    };  }}
type LayoutOverrideProps = LayoutProps & {  GlobalAppstore: any;};
// 自定义Layout@TRoute("/")  .Options({ key: "trantor.layout", isPrimary: true })  .Ancestors("root")// @ts-ignore@InjectModules([  "Utils",  "engine",  "configure",  "globalStore",  "layoutStore",  "globalService",  "SideNavigation",  "GlobalNavigation",  "GlobalTabbar",  "DynamicFeatures",  "IframeManager",  "tabbars",
  // 导入 Appstore 组件  "GlobalAppstore",])@observerclass LayoutRouteOverride extends LayoutRoute {  render() {    const {      renderRoutes,      SideNavigation,      GlobalNavigation,      GlobalTabbar,      DynamicFeatures,      route,      globalStore,      GlobalAppstore,    } = this.props as LayoutOverrideProps;
    return (      <div className={cx("route-layout-container", this.layout)}>        <GlobalNavigation          layout={this.layout}          onApplication={this.handleApplication}          handleMenu={this.handleMenu}          onDashboardEntryClick={this.handleOpenDashboard}        />        <div className={cx("route-layout-content")}>          <div className="override-minor-nav">            <div className="override-appstore">              <GlobalAppstore                list={globalStore.list}                onClick={this.handleApplication}              />            </div>            <div className="override-app-stock">              <Icon type="dependency-management" className="active" />              <Icon type="market-upload" />              <Icon type="notice-management" />              <Icon type="base-product" />              <Icon type="custom-product" />            </div>          </div>          <GlobalTabbar            disabled={!this.isTabbar}            sideNavigation={              <SideNavigation                onClick={this.handleMenu}                onApplication={this.handleApplication}              />            }            renderRoutes={(extraProps = {}) => {              return (                <div className="route-layout-match">                  {renderRoutes(route.routes, extraProps)}                </div>              );            }}          />        </div>        <DynamicFeatures />      </div>    );  }}
2, 创建 layout-override.scss 并贴入代码
.override-minor-nav {  background-color: #ededed;  width: 42px;  display: flex;  flex-direction: column;}
.override-appstore {  width: 42px;  height: 42px;  display: flex;  justify-content: center;  align-items: center;  .nusicon-appstore {    font-size: 20px;  }}.override-app-stock {  flex: 1;  display: flex;  flex-direction: column;  .nusicon {    font-size: 20px;    padding: 12px 6px;    cursor: pointer;    color: #18181a;    &:hover,    &.active {      color: #ec6c3a;    }  }}
// 这个地方也可用用主题定制的方式重写.pk-global-nav {  background-color: #fefefe;  border-bottom: 1px solid #eceef1;}
3, 创建 index.ts 修改代码
import "./layout-override";import "./layout-override.scss";4, 最终效果
![]()
![]()
![]()
如果需要特殊二开定制某个特定功能,需要获取 workspace 源代码进行对应修改,可钉钉联系 李伟峰,许超