多业务模块打成镜像文件运行
示例代码:https://terminus-org.app.terminus.io/workBench/projects/241/apps/5567/repo
trantor 可以通过嵌入模块的方式,将多个小模块合并为一个应用运行。应用正常启动完成后,在交付控制台上会看到多个模块,但是在运行时,对子模块的调用都会路由到同一个 JVM。
新建启动工程
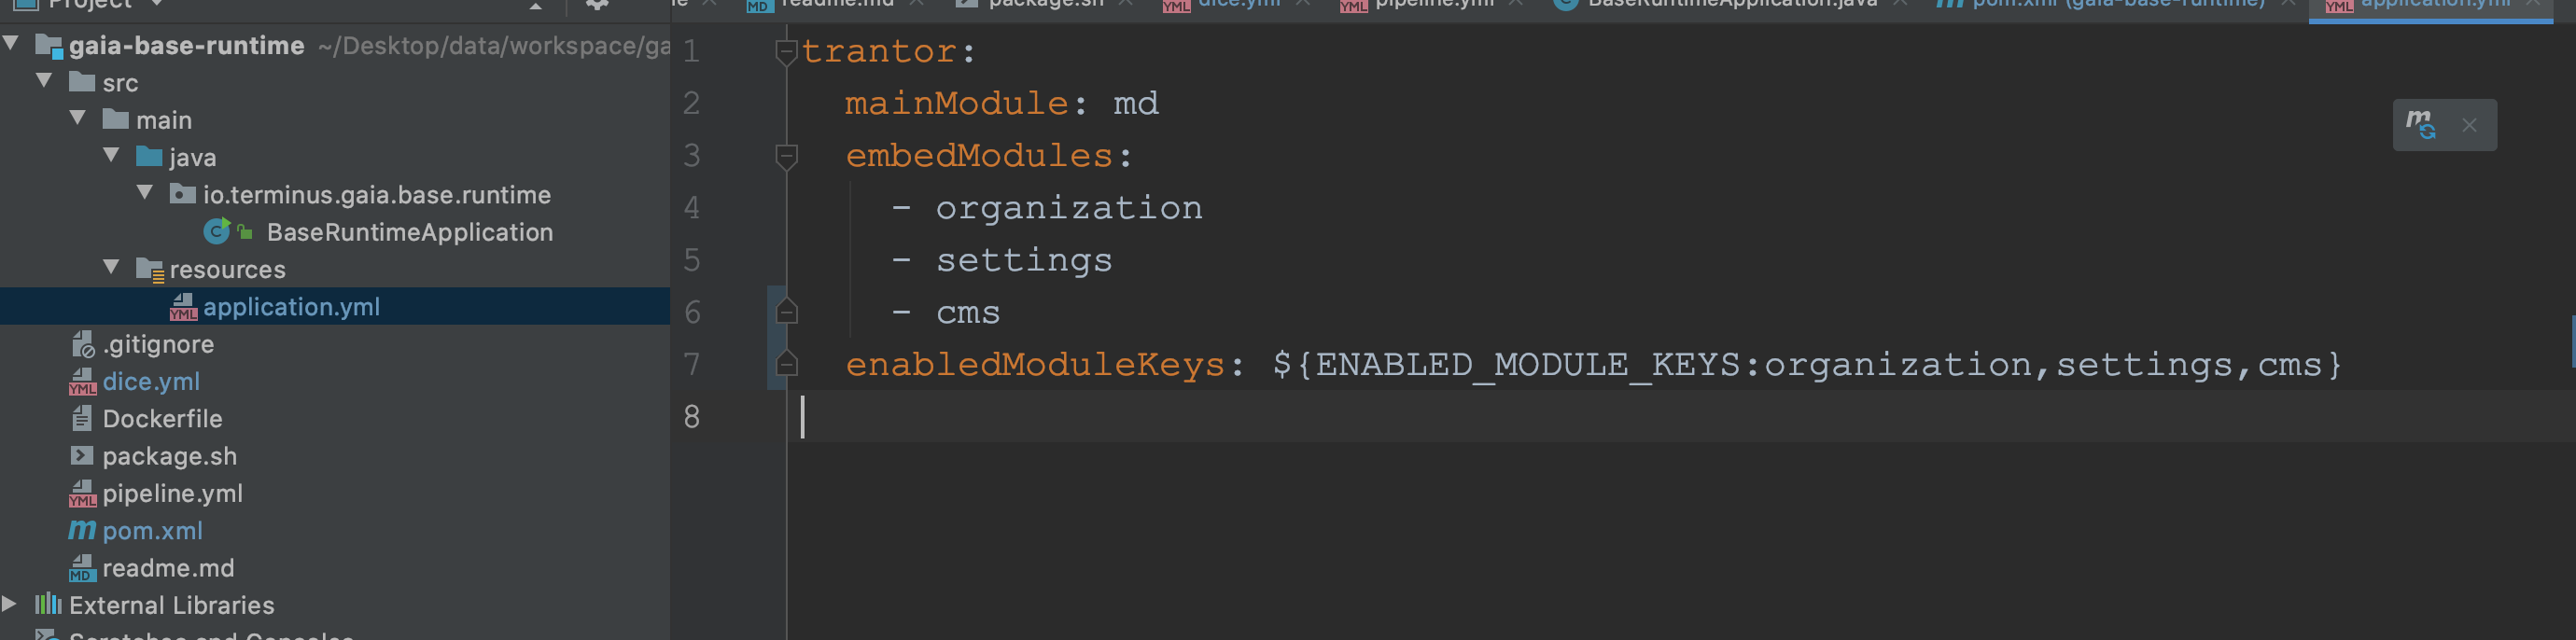
配置 application.yml
新建应用后,配置 application.yml,如需要合并 md、organization、settings、cms 模块。
这个可以任意选择一个作为 mainModule。
配置 pom.xml
<?xml version="1.0" encoding="UTF-8"?><project xmlns="http://maven.apache.org/POM/4.0.0"         xmlns:xsi="http://www.w3.org/2001/XMLSchema-instance"         xsi:schemaLocation="http://maven.apache.org/POM/4.0.0 http://maven.apache.org/xsd/maven-4.0.0.xsd">    <modelVersion>4.0.0</modelVersion>    <groupId>io.terminus.gaia</groupId>    <artifactId>gaia-base-runtime</artifactId>    <version>0.0.1-SNAPSHOT</version>
    <parent>        <artifactId>framework-parent</artifactId>        <groupId>io.terminus.trantor</groupId>        <version>0.16.1-SNAPSHOT</version>    </parent>
    <properties>        <gaia.version>2.0-SNAPSHOT</gaia.version>        <trantor.version>0.16.1-SNAPSHOT</trantor.version>    </properties>
    <dependencies>        <!--        gaia 依赖-->        <dependency>            <groupId>io.terminus.gaia</groupId>            <artifactId>gaia-md-implement</artifactId>            <version>${gaia.version}</version>        </dependency>        <dependency>            <groupId>io.terminus.gaia</groupId>            <artifactId>gaia-organization-implements</artifactId>            <version>${gaia.version}</version>        </dependency>
        <dependency>            <groupId>io.terminus.gaia</groupId>            <artifactId>gaia-settings-implement</artifactId>            <version>${gaia.version}</version>        </dependency>
        <dependency>            <groupId>io.terminus.gaia.cms</groupId>            <artifactId>gaia-cms-implement</artifactId>            <version>1.0-SNAPSHOT</version>        </dependency>        <!--        trantor 依赖-->        <dependency>            <groupId>io.terminus.trantor</groupId>            <artifactId>trantor-runtime</artifactId>            <version>${trantor.version}</version>        </dependency>    </dependencies>
    <build>        <finalName>gaia-base-runtime</finalName>        <plugins>            <plugin>                <groupId>org.springframework.boot</groupId>                <artifactId>spring-boot-maven-plugin</artifactId>                <configuration>                    <attach>false</attach>                    <mainClass>io.terminus.gaia.base.runtime.BaseRuntimeApplication</mainClass>                    <layout>JAR</layout>                </configuration>            </plugin>        </plugins>    </build>
</project>
将新建的工程应用打成 docker 镜像
编写打包脚本
#!/bin/bash
mvn clean package -Dmaven.test.skip=true -U
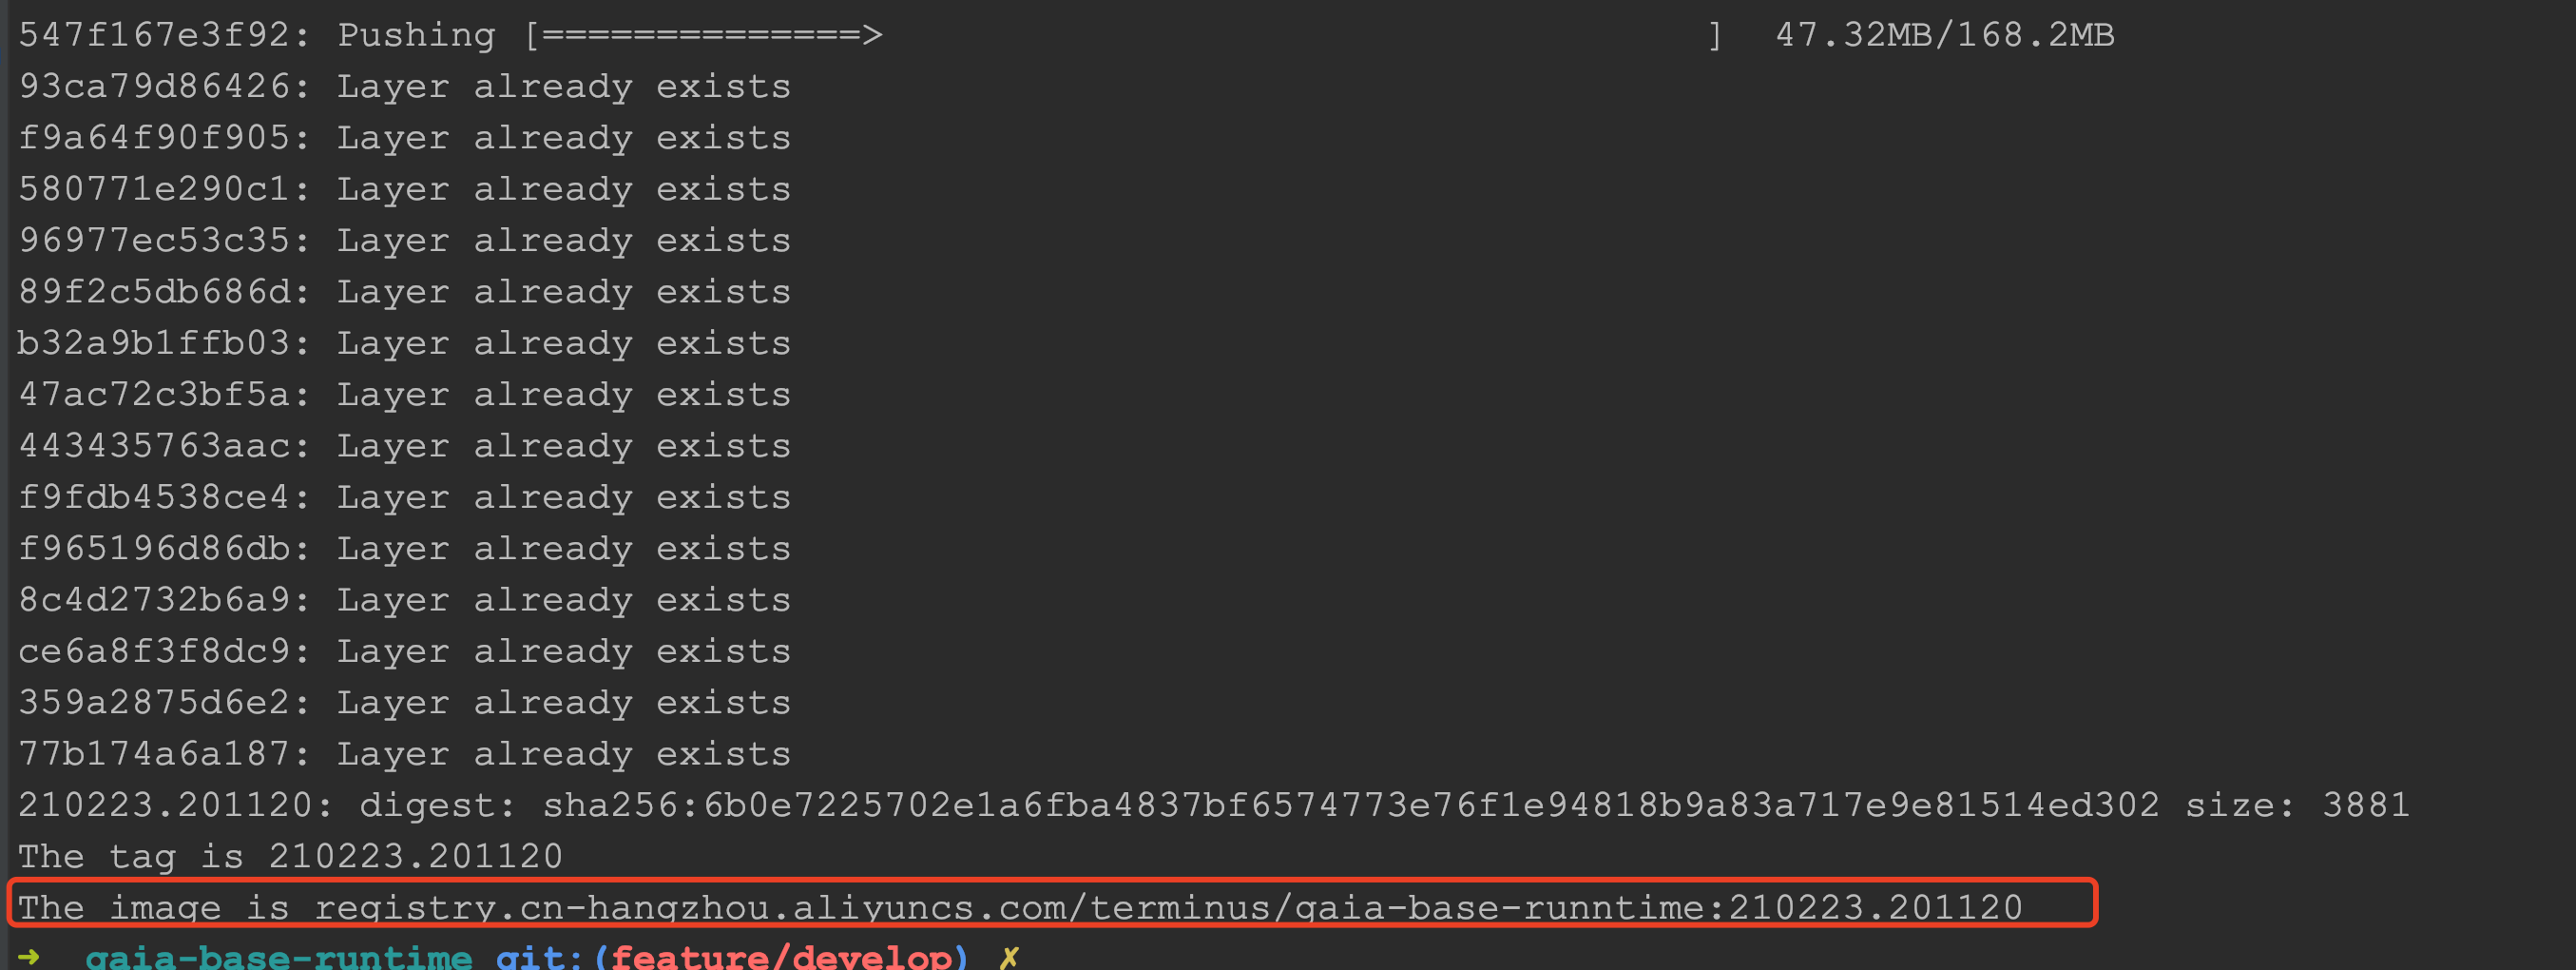
tag=$(date "+%y%m%d.%H%M%S")trantor_git_commit=`git rev-parse HEAD`
image="registry.cn-hangzhou.aliyuncs.com/terminus/gaia-base-runntime:$tag"
echo "commitID: $trantor_git_commit\nbuildTime: $(date "+%Y-%m-%d %H:%M:%S")" > ./base-version
docker build -t "$image" .
rm -rf ./base-version
docker push "$image"
# pbcopy命令仅支持macosecho "$tag" | tr -d "\n" | pbcopy
echo "The tag is $tag"echo "The image is $image"编写 Dockerfile
FROM registry.cn-hangzhou.aliyuncs.com/terminus/terminus-openjdk8-node-maven:1.0.4ENV USE_AGENT=trueRUN wget -q https://terminus-dice.oss-cn-hangzhou.aliyuncs.com/spot/java-agent/action/release/3.13/spot-agent.tar.gz -O /tmp/spot-agent.tgzRUN \ if [ $USE_AGENT = true ]; then \ mkdir -p /opt/spot; tar -xzf /tmp/spot-agent.tgz -C /opt/spot; rm -rf /tmp/spot-agent.tgz; \ fiRUN rm -f /opt/spot/spot-agent/plugins/agent-logback-plugin.jarRUN rm -f /opt/spot/spot-agent/plugins/agent-logback-spring-boot-plugin.jarCOPY ./base-version /base-versionWORKDIR /COPY ./target/gaia-base-runtime.jar /app/app.jarEXPOSE 8080RUN echo "Asia/shanghai" > /etc/timezone;CMD java $JAVA_OPTS $CATALINA_OPTS -javaagent:/opt/spot/spot-agent/spot-agent.jar -jar /app/app.jar执行命令
登陆 docker:
docker login -u=xxx -p=yyyy registry.cn-hangzhou.aliyuncs.com
执行命令:
sh package.sh
部署到 dice
编写 dice.yml
version: "2.0"services: gaia-bse-runtime: image: "registry.cn-hangzhou.aliyuncs.com/terminus/gaia-base-runntime:210223.180404" ports: - 8080 resources: cpu: 2 mem: 4096 network: mode: "container" deployments: replicas: 1 expose: - 8080 health_check: http: port: 8080 path: "/actuator/health" duration: 600addons: api-gateway: plan: "api-gateway:basic" registercenter: plan: "registercenter:basic"envs: {}编写 pipeline.yml
version: '1.1'
stages:  - stage:      - git-checkout:          params:            depth: 1
  - stage:      - release:          params:            dice_yml: ${git-checkout}/dice.yml
  - stage:      - dice:          params:            time_out: 300            release_id_path: ${release}
添加环境变量
开发环境增加插件,如: